French Drains, Channel Drains and Dry Wells: Moving Water the Right Way
When water really does have to be collected and sent somewhere, you only have a few tools: a perforated drain pipe in gravel, a gravel trench, a channel drain, and a place for it all to end up. Building them is the easy part. The hard part is deciding where the water is allowed to go, and that is where most homeowner drainage projects go wrong.
General guidance for US homeowners. Keep runoff on your own lot: never send it onto a neighbor's property, into the street where that is not allowed, into a sanitary sewer or toward a septic system. Call 811 before digging. Anything tied into a storm sewer, a stream or a building's foundation drains needs local approval or a professional. Part of the PlantMapper Yard Drainage section.
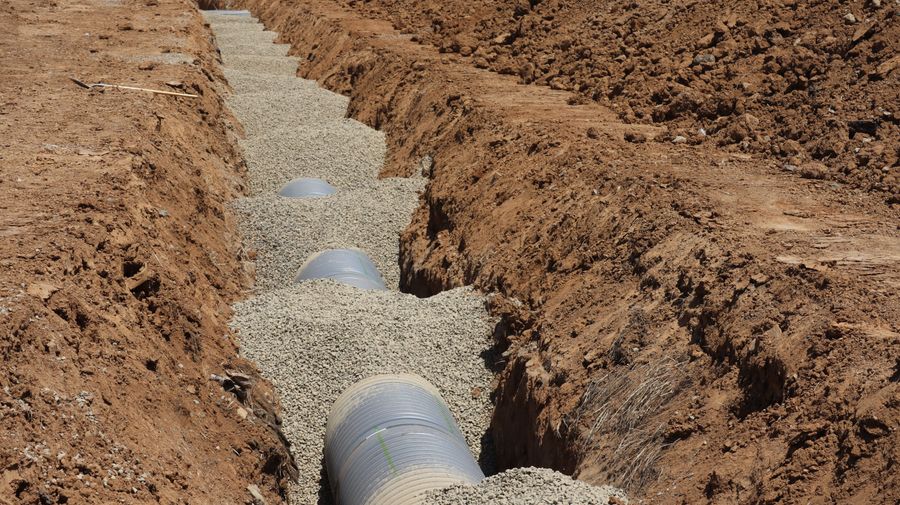
The pipe is the easy part; the destination is the hard part · photograph via Pexels
Before you dig
A drain is only as good as where it ends
It is tempting to treat drainage as a building job: dig a trench, lay a pipe, fill it with gravel. Physically that is most of it, and it is well within reach of a handy homeowner.
What actually decides whether the project works, and whether it is even allowed, is where the water ends up. A French drain that empties into soggy ground achieves nothing. One that dumps water onto a neighbor's lot can leave you responsible for the damage, and in many places it breaks local rules. One tied into a sanitary sewer overloads the treatment plant and is prohibited almost everywhere.
So this guide starts with the destination, then covers slope and layout, then the three systems themselves. If you do not yet know what is causing the problem, go back to Diagnosing Drainage first, and if the cause is compaction or poor soil structure, Improving Soil Drainage will be cheaper and more effective than anything on this page.
The first question
Where is the water allowed to go?
Settle this before you plan anything. Most yards have one or two real options and several that are not options at all.
Possible destinations for yard runoff, and what each involves. Rules differ by state, county, city and HOA, so always check locally before committing.
Destination
An option?
What you need to know
Daylighting to a lower spot on your own lot
Often the simplest choice
The pipe surfaces at a pop-up emitter or splash pad lower down your own yard, well away from the house and property line, where water can spread and soak in
A rain garden, swale or planted area
Excellent where it works
Slows runoff and lets it soak in on your own lot. Cheap, attractive, and encouraged by many cities and stormwater programs
A dry well on your own lot
Only if the perc test supports it
Works only where the soil actually drains and the water table stays low. Keep it at least 10 ft from the foundation (a common rule of thumb; many codes set their own)
A municipal storm sewer or curb outlet
Sometimes, with approval
Ask your city or county first. Many do not allow private connections or curb cuts; others require a permit and specific fittings
A ditch, creek or wetland
Sometimes, with approval
Discharging to a stream, ditch or wetland can fall under local, state or even federal rules, and some ditches belong to the county or a drainage district. Ask before you dig
A sanitary sewer
No
Runoff must never go into a sanitary sewer or house cleanout. It overloads treatment plants and causes sewage backups; most cities prohibit it outright
A neighbor's yard
No
Concentrating runoff and sending it onto adjoining property can make you liable for the damage, and it is one of the most common causes of neighbor disputes
The street, sidewalk or alley
Usually no
Many places prohibit draining onto the street or sidewalk, where it can ice over in winter; only where your city expressly allows it
A septic tank or drain field
No
Extra water floods the system and can make the drain field fail
If there is truly nowhere for the water to go, do not install a drain. This is the situation people find hardest to accept, and it is common on flat lots with clay soil and a high water table in winter or spring. Collecting water into a pipe and delivering it to ground that is already saturated just moves the puddle. In that case the honest answers are raising grades, a rain garden or pond, wet-tolerant plants, and improving the soil, all covered in Improving Soil Drainage.
Getting it right
Slope, depth and layout
Water moves because you give it somewhere lower to go. The numbers are not demanding, but they are not optional.
Working figures for residential yard drainage. Sites vary, so get advice on anything large.
Item
Typical figure
Notes
Slope on a perforated French drain
At least 1/8 in per ft (about 1%)
About 1¼ in over 10 ft. A steady slope matters more than a steep one; keep it consistent with no dips
Slope on a solid pipe carrying water away
1/8-1/4 in per ft
For the run that takes collected water to its outlet
Deeper on heavy soil; shallower under a lawn where you mainly want to catch surface water. In cold zones, deeper helps keep it below frost
French drain trench width
6-12 in
Wide enough to work in, no wider
Spacing between parallel drains
10-15 ft on clay, 15-30 ft on loam
Closer on slower soil
Gravel over the pipe
At least 8-12 in of clean stone
Plus a layer of sand and topsoil if it runs under lawn
Distance of a dry well from the house
At least 10 ft (common rule of thumb)
Farther on expansive clay, and never uphill of a basement, retaining wall or septic field; follow any local minimum
✓Layout principles
Intercept, do not chase. One drain across the top of a wet area, catching water before it arrives, beats a network under the wet part.
Run across the slope, not down it, for an interceptor (curtain) drain.
Herringbone or parallel branches feeding one main line is the classic layout for a wet lawn.
Keep it simple. Two well-placed drains that empty properly beat six that do not.
Keep the slope steady from the high end to the outlet, with no dips where silt settles.
Add access: a cleanout or inspection port at the start of each run and at junctions and turns.
!Layout mistakes
A drain that runs uphill somewhere in the middle, because grades were guessed instead of measured.
No real outlet, so water has nowhere to go once it reaches the end.
No outlet at all: a trench that just stops in the ground.
Drains sloped toward the house instead of away from it.
A drain under a future driveway or parking spot, with no protection from the load.
No cleanout access, so a clog in ten years means digging.
The workhorse
French drains
A gravel-filled trench, usually with a perforated pipe in the bottom, that collects water from the surrounding soil and carries it to an outlet. It is the standard tool for a soggy lawn or an area where water seeps in from higher ground.
Confirm the outlet first
There is no point starting until you know where the water will go. See the destination section above.
Lay out the line and check the slope
Mark the line with paint or stakes and string, and set the grades with a line level, a laser level or a long board and a 4-ft level. Aim for a steady fall of at least 1/8 in per foot from the top of the run to the outlet. Guessing is the most common reason a drain does not work.
Call 811 before you dig
Not optional. See Calling 811 and private lines below. French drain trenches are deep enough to hit cables and pipes.
Dig the trench
About 6-12 in wide and 18-24 in deep, following the slope you set. Keep topsoil and subsoil in separate piles if you plan to restore the lawn.
Line the trench with filter fabric
Use a non-woven geotextile, lapped up both sides and left long at the top. This stops fine soil washing into the gravel and silting the drain. A French drain without a fabric wrap may clog in a few years; one with it can last decades.
Bed and lay the perforated pipe
Put about 2 in of clean gravel in the bottom, then lay 4 in perforated drain pipe (rigid PVC or corrugated) to the slope. Holes facing down is the usual practice for collecting groundwater. Use proper couplings at joints.
Backfill with clean, washed stone
Use ¾-1½ in clean, washed, angular crushed stone, not fill gravel with fines and not round pea gravel. It must be washed, because fines silt the drain. Bring it to within 4-6 in of the surface.
Close the fabric and finish
Fold the fabric over the top of the stone to complete the wrap. Then either finish with decorative gravel to the surface so it catches surface water too, or cover with sand, topsoil and sod if you want it hidden.
✓Do
Wrap all the stone in filter fabric: this is the detail that decides how long it lasts.
Use clean washed stone, angular, ¾-1½ in.
Fit a cleanout or inspection port at the start of the run and at junctions.
Send the outlet somewhere real: daylight on your own lot, a rain garden, a pond, a dry well that passed a perc test, or an approved connection.
Keep it away from tree roots where you can; willows, silver maples and poplars will find it.
Photograph the open trench before backfilling, with measurements. In ten years you will be glad you did.
!Do not
Rely on a sock-wrapped pipe alone in silty soil instead of a properly wrapped trench: socks clog.
Backfill with unwashed gravel or fill, which silts the drain within a couple of years.
Leave dips or humps in the pipe, where water and silt sit.
Run it toward the house, the property line or a retaining wall.
End it in the ground with no outlet: that is a dry well, and it needs sizing and testing as one.
Cover it up and forget it. Mark it on a sketch of the yard.
Clean, washed, angular stone; never unwashed fillPerforated pipe bedded on gravel and laid to a steady slopeEvery drain needs a destination that can actually take the water
As an Amazon Associate, PlantMapper may earn from qualifying purchases. Prices and availability are set by Amazon. Keep runoff on your own lot: never send it onto a neighbor's property, into the street where not allowed, into a sanitary sewer or toward a septic system.
Surface water
Channel drains and gravel trenches
A French drain collects water from inside the soil; these two collect it from the surface. They are simpler, shallower and often all a paved area needs.
Channel drains (trench drains)
A preformed channel with a removable grate, set into a hard surface to catch runoff along a line.
Best for Across the bottom of a driveway, along the edge of a patio, at a doorway, where a slope meets a level area
Set the top flush with the finished surface, or about 1/8 in below so water drops in instead of skating over
Set it in concrete on both sides: a channel that shifts cracks the paving around it
Slope along the channel to the outlet, then solid pipe to the destination
Pick the right load rating: a light residential grate will not survive car tires across a driveway
Fit a catch basin or debris basket at the outlet: it is what makes the system cleanable
Gravel trenches and filter strips
A simple stone-filled trench, with or without a pipe, that catches surface water and lets it soak in. The cheapest useful drainage there is.
Best for Along the bottom of a slope, the edge of a patio, the foot of a bank, beside a path
About 8-16 in wide and deep, wrapped in filter fabric, filled with clean washed stone
No pipe needed where the trench itself can soak away what it collects
Add a perforated pipe in the bottom if it has to carry water away as well as hold it
It can look intentional: a gravel strip along a bed edge reads as a design feature, not a drain
Catch basins, downspout drains and cleanouts
The fittings that make a system maintainable rather than disposable.
A catch basin collects water at one point: a low spot on a patio, the bottom of a slope
A downspout adapter connects a gutter downspout to solid pipe that carries roof water well away from the foundation
A catch basin with a sump or debris basket holds back the grit and leaves that would otherwise clog the pipe. It is the single most useful fitting in a yard system
Cleanouts at the start of runs and at bends let you clear a clog without digging
Put access at every junction: the small extra cost now is nothing compared with digging later
Swales and dry creek beds
The soft alternative: shallow channels that carry water and let it soak in while looking like part of the landscape.
A swale is a shallow grassed dip running gently across the yard; you can mow it and it is invisible when dry
A dry creek bed is the same idea finished with river rock and boulders, planted along the edges with natives that tolerate wet and dry spells
Both slow water down and let it soak in along the way, which is the whole point of green stormwater design
Cheap to build: mostly moving soil and placing stone
They need somewhere to go too, even if that is a rain garden at the bottom
The destination
Dry wells, and when they will not work
A dry well is a buried chamber or gravel pit that holds collected water and lets it seep into the surrounding soil. It is a common destination for downspout and drain water, and it fails more often than any other part of a system because people put them in soil that cannot take water.
When a dry well works
Fast-draining soil, low water table
The soil has to take the water away faster than you deliver it, or the dry well fills and stays full.
Perc test first: see Diagnosing Drainage. A test hole that empties within a few hours is a good sign
The water table must stay well below the bottom of the dry well, in wet seasons as well as dry ones
Sand, gravel and stony subsoils are good candidates
Test at the depth the dry well will sit, not just near the surface
When it will not
Clay, high water table, no room
These are the conditions that give you a dry well that works for one season and then does nothing.
Heavy clay: the chamber fills and the water has nowhere to go
A high water table in winter or spring: the surrounding soil is already saturated
Too close to the house: you are then delivering water to your own foundation or basement
Fill soil or contaminated ground: get advice
Steep slopes, where water can pop back out downhill
Sizing and siting
Bigger than people expect
A dry well must hold the runoff from a storm long enough for it to soak away. Undersized dry wells are extremely common.
Size it from the roof or paved area draining into it and the perc rate. Manufacturers and many local stormwater programs publish sizing methods, and a contractor will use one
At least 10 ft from the house is a common rule of thumb, farther on expansive clay; follow any local minimum
Never uphill of a basement, a retaining wall, a septic field or a neighbor's property
Keep clear of utility lines, private wells and tree roots; many areas set minimum distances from wells and septic systems
Anything large should be designed, not guessed, and some areas require a permit or regulate dry wells
How one is built
Plastic chambers or clean stone, wrapped
Two common types, both wrapped in filter fabric to stop soil silting up the space.
Plastic dry well chambers or crates: lots of open space inside, quick to install, the modern norm
A stone-filled pit: clean washed 1½-2 in stone; roughly 30-40% of the volume is usable open space
Wrapped completely in filter fabric, except where the design calls for an open bottom
Inlet pipe with a catch basin or debris filter ahead of it, and an inspection port if possible
Backfill and restore the surface, and record where it is
The most useful thing to know about dry wells. If water is still standing in your perc test hole after about 12 hours, a dry well is very unlikely to work, and building one anyway is the most common expensive mistake in home drainage. On slow soil the honest options are a rain garden or pond designed to hold water, raising grades so you do not need the ground to drain, daylighting the water to a lower part of your own lot, or an approved connection to a storm sewer. Ask before you dig.
Before any digging
Calling 811 and finding private lines
Drainage trenches are among the deepest holes most yards ever see, and they are dug exactly where utilities tend to run. This section is short because the rule is simple: find out first.
✓How to find out what is down there
Call 811 (or use your state's online request) a few business days before you dig. Utilities mark their lines for free with paint or flags, and in most states you are required to call.
Remember 811 does not mark private lines: anything from your meter to the house, or that you or a previous owner installed, such as sprinkler lines, landscape lighting, a cable to a shed, a gas line to a grill or a line to a detached garage.
Check your property survey and any plans you received when you bought the house, and look for cleanouts, valve boxes and meter locations.
Hire a private utility locator for a long or deep trench, or if you know there are private lines.
Respect the tolerance zone: dig by hand within the distance your state sets on either side of a mark (often around 18-24 in).
Dig test holes by hand where you suspect something, before bringing in a machine.
Treat every buried cable as live.
!What is commonly found, and where
Sewer and storm lines, usually running from the house toward the street or the back of the lot.
The water service, running from the street or meter to the house, sometimes shallower than you expect in warm climates.
Gas lines, including yellow plastic pipe that a metal detector will not find: a very good reason to hand dig.
Cable to a garage, shed or pond pump, often shallow and unrecorded.
Sprinkler lines and low-voltage lighting cable, usually just under the sod.
Septic tanks, drain fields and old dry wells from earlier work, often not where anyone expects.
Doing the work
Installation principles
Six rules that apply whatever you are building.
Work back from the outlet
Set the level of the outlet first, then set every grade upstream from it. Working from the top down is how drains end up needing to run uphill for the last few feet.
Measure grades, do not eyeball them
Use a line level, a laser level or a long straight board and a 4-ft level. Ground that looks flat is often 4 in out over 30 ft, in the wrong direction.
Keep fines out of everything
Filter fabric around all the stone, washed stone rather than fill gravel, and a catch basin ahead of any pipe run. Silt is what kills yard drainage systems.
Give access at every junction
Cleanouts and inspection ports are cheap during construction and very expensive to add later. Fit more than you think you need.
Backfill properly and restore the surface
Backfill in layers and tamp lightly, or the ground settles into a groove over the drain. Keep topsoil separate so the restored lawn has something to grow in.
Record what you built
A sketch with measurements from two fixed points such as house corners, plus photos of the open trench. It is worth a great deal in five or ten years, to you or to whoever owns the house next.
Money
What drainage costs
Rough US ranges for planning only; they vary widely by region. Access, soil and how much dirt has to be hauled away move these numbers a lot.
Rough US costs for residential yard drainage. Estimates for planning only.
Item
Rough cost
Notes
4-inch perforated drain pipe
About $1-$3 per foot
Corrugated coil or rigid PVC; fittings extra
Clean washed drainage stone
About $40-$90 per ton delivered
Allow roughly 0.1 ton per foot of a 12 x 24 in trench
Non-woven filter fabric
About $0.25-$1 per sq ft
Do not skimp: it decides how long the drain lasts
Channel drain with grate
About $15-$50 per foot
Plus concrete; heavier load ratings cost more
Catch basin
About $25-$150
The best-value fitting in the system
Dry well chambers
About $60-$250 each
A home dry well often uses one to several
Dumpster or dirt hauling
About $300-$700
A trench produces more dirt than people expect
Mini excavator rental
About $250-$500 per day
Often cheaper than hand digging anything large; trenchers are another option
DIY French drain, per foot
About $10-$30
Materials and rental only
Contractor-installed French drain, per foot
About $30-$100+
Varies hugely with access, depth and hauling
Drain camera inspection
About $150-$500
Nearly always worth it before digging up an existing drain
On the job
The drainage installation checklist
Fifteen checks. Ticks are saved in this browser only.
Before you start
Building it
Finishing
System questions
French drains and dry wells: frequently asked questions
What is a French drain and how does it work?
A gravel-filled trench, usually with a perforated pipe in the bottom, wrapped in filter fabric. Water in the surrounding soil moves into the gravel, which is far more open than the soil, then into the pipe and along it to an outlet. It works on soil that drains slowly but does drain, and it is the standard tool for a soggy lawn or for catching water seeping in from higher ground. It only works if the outlet is lower than the whole run and somewhere the water is allowed to go.
How deep should a French drain be?
For most yards, about 18-24 in deep and 6-12 in wide, laid to a steady slope of at least 1/8 in per foot (about 1¼ in over 10 ft). Go shallower where you mainly want to catch surface water under a lawn, and deeper on heavy soil or to keep it below frost in cold zones. A drain protecting a basement foundation is a different, deeper job for a professional. What matters most is a steady slope and a real outlet at the end.
Where can I send yard drainage water?
Keep it on your own lot wherever possible: daylight it to a lower spot through a pop-up emitter, or send it to a rain garden, swale, pond or a dry well that passed a perc test. Connecting to a storm sewer or curb outlet needs your city or county's approval, and many do not allow it. Discharging to a creek, ditch or wetland can fall under local, state or federal rules. Never send runoff onto a neighbor's property, into a sanitary sewer or toward a septic system, or into the street where that is not allowed.
Why do dry wells fail?
Almost always because the soil cannot take water fast enough. A dry well needs fast-draining soil and a water table well below its bottom; on heavy clay, or where groundwater rises in wet seasons, it fills up and stays full. The other common causes are undersizing, since a dry well has to hold a storm's runoff long enough to soak away, and silting, which is why a catch basin ahead of it and a full fabric wrap matter so much. Do a perc test first: if water is still standing after about 12 hours, choose another approach.
How far should a dry well be from the house?
At least 10 ft from the foundation is a common rule of thumb, and farther is better, especially on expansive clay that swells and shrinks as it wets and dries. Many local codes set their own minimum distances from buildings, property lines, private wells and septic systems, so check. Never put one uphill of a basement, retaining wall or neighbor's yard. If the lot is too small for a sensible distance, a dry well is the wrong solution.
Can I connect my yard drainage to the sewer?
Never to the sanitary sewer or a house cleanout: runoff overloads treatment plants and causes sewage backups, and most cities prohibit it. A connection to a municipal storm sewer or a curb outlet is sometimes possible, but usually needs your city or county's approval and sometimes a permit and specific fittings. Ask before you plan anything that depends on it, because if the answer is no it changes the whole design.
Do I need a pipe in a French drain?
Not always. Where the trench itself can soak away everything it collects, such as a short gravel trench at the foot of a bank, stone alone works and costs less. You need a perforated pipe when the drain has to carry water some distance to an outlet rather than just hold it and let it soak in. Either way, the filter fabric wrap is what keeps it working.
What size gravel should I use for a French drain?
Clean, washed, angular crushed stone of about ¾-1½ in for the trench, and 1½-2 in for a stone-filled dry well. The key words are clean and washed: unwashed gravel or anything with fines silts the drain within a couple of years. Avoid round pea gravel, which packs together and leaves much less open space than angular stone.