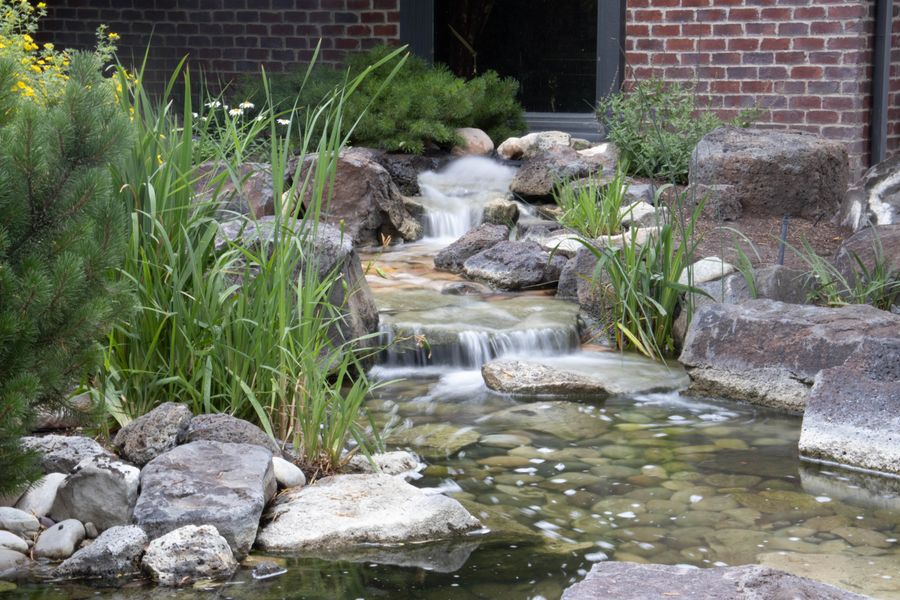
Most of pond building is digging, and the shape you dig is the real design. The plant shelf, the sloping beach and a deep zone sized for your winters decide whether the pond supports life, survives a freeze and hides its liner. The liner itself is just a rubber sheet that follows the hole.
Open water is a serious drowning risk for young children - decide on safety and check local barrier rules before you dig; see safety. Pumps and lights must be rated for outdoor submersible use on a GFCI-protected outlet, and any new circuit should be installed by a licensed electrician. Call 811 a few days before you dig. Part of the PlantMapper Water Features section.
The shape you dig is the pond; the liner is just a sheet · photograph via Pexels
What really counts
Three things decide whether a pond succeeds
The profile. A pond dug as one flat-bottomed bowl supports little and looks like a hole. A pond with a sloping beach, a plant shelf and a deeper center supports far more, handles winter better and looks natural, and digging it that way costs nothing extra.
The level. Water settles perfectly flat and exposes every error in your digging. If one side of the rim sits 1½ in lower than the other, liner shows along the high side for as long as the pond exists, and there is very little you can do about it later.
The edge. Hiding every inch of liner is what makes a pond look like it belongs. Nearly every amateur-looking backyard pond has a band of black liner showing somewhere.
First steps
Before you dig
Five quick checks, all of them much harder to deal with once the hole is open.
Decide on safety
If small children live at or visit your home, decide now between a pond with a proper rigid cover or a fenced barrier, and a feature with no standing water. Some localities apply pool-style barrier rules to ponds over a certain depth, and HOAs may have their own, so check before you design. Adding a safe cover later to a pond not designed for one rarely works well.
A pond hole commonly goes 2-3 ft deep, plenty to hit gas lines, water service, electric cable, irrigation lines or a septic line. Call 811 (or use your state's online request) a few business days before digging, and the utilities will mark their lines for free.
Private lines such as irrigation, low-voltage lighting or a cable to a shed are not marked by 811. Dig the first spade's depth by hand, and keep well clear of septic tanks and drain fields.
Check the soil and the water table
Dig a test hole first. Rocky or root-filled ground means extra underlayment; heavy clay digs well and holds a shape; sandy soil caves in as you cut shelves.
If the test hole fills with water, the water table is high. Groundwater can lift an empty liner like a bubble and float a preformed shell right out of the ground. Get advice or pick another spot.
Mark it out and look at it for a few days
Lay out the shape with a garden hose or rope and view it from the house, the deck and an upstairs window before cutting any sod. Keep the outline simple: a broad oval or kidney looks natural, while a wiggly shape with small bays looks fussy and is much harder to line.
Watch where the sun falls through the day, and make sure no tree branches hang over the outline.
Plan where the dirt and the overflow will go
A 6 x 7 ft pond dug about 2 ft deep produces close to 3 cubic yards of soil, more once it is loosened. Decide ahead of time whether it becomes a berm, a raised bed, a bog garden or a dumpster load.
Set the overflow point before you fix the levels too: a deliberate low spot that spills into a planted bed, gravel strip or bog area on your own lot, never toward the house foundation, onto a neighbor's yard, or into the street.
The most important part
Getting the profile right
Dig the shape on purpose instead of digging a hole and hoping. These are the depths that make a pond work.
The pond profile from the edge inward. Depths are below the finished water line; adjust the deep zone for your zone.
Zone
Depth
Width
What it does
Beach or sloping edge
0-4 in, gently sloping
2 ft or more of slope
The way out for frogs, toads, turtles, birds, pets and anything that falls in. At least one side
Damp margin / bog area
Above water level, kept moist
As much as you like
Moisture-loving plants; somewhere for overflow to go and a route for wildlife
Plant shelf
8-10 in
10-12 in
Where most planting goes: blue flag iris, pickerelweed, arrowhead, marsh marigold
Second shelf (optional)
16-18 in
10-12 in
Deeper marginals, and a place to set a water lily basket while it establishes
Deep zone (no fish)
18-30 in
At least a third of the area
Steadier temperature and less summer overheating. Water lilies go here
Deep zone for overwintering fish
24-30 in in moderate cold; 3 ft+ in zones 3-4
A good part of the pond
Deep enough not to freeze solid where fish winter. Zones 7 and warmer can go shallower; koi want more
Sides between shelves
About 20° off vertical
-
Steeper and soil and rock slide off the liner; flatter and you lose volume
✓A good profile
At least one gently sloping beach, ideally on the side away from the main view.
A plant shelf at 8-10 in running around much of the pond.
A deep zone sized for your winters over a good share of the area: deeper still if fish will overwinter.
Sides sloping about 20° off vertical between levels, so backfill and stone stay in place.
Shelves wide enough for a planting basket: 10 in at the very least, 12 in is better.
A deliberate low point in the rim to act as the overflow.
!A poor profile
A flat-bottomed bowl with straight sides: nowhere to plant and no way out for wildlife.
Shelves too narrow for a basket, so every plant ends up in the deep zone.
Shallow all over, so it overheats in summer and freezes solid in a cold-zone winter.
Steep sides between levels, so soil and river rock slide to the bottom.
No beach edge at all, which traps wildlife and wastes a great planting spot.
An outline full of small bays and points, which can never be lined neatly.
Bring the whole rim to one level before going further. Drive a stake as a fixed reference, lay a long straight board across with a level on it, and check every point around the edge (a laser or water level makes this easier on a big pond). The water will reveal every fraction of an inch of error, and once the liner is in and the pond is full, the only thing you can do about the high side is look at it.
Digging it
Digging the pond, step by step
Order matters: work from the outside in and the top down, and keep checking the level.
Cut the outline and lift the sod
Cut around the marked shape with a spade, then lift the sod from the whole area. Keep it if you plan to lay it back over the liner edge, one of the tidiest ways to finish a wildlife pond.
Strip another 12 in outside the outline so there is room to set the edging later.
Dig the shallow zones first
Take the whole area down to the plant shelf depth of 8-10 in, then mark the inner edge of the shelf and dig the deeper parts from there.
Cut the shelves truly flat and to an even depth: they are what the plant baskets sit on.
Dig the deep zone and slope the sides
Take the deep area down to the depth your zone needs, sloping the sides about 20° off vertical between levels so backfill and stone do not slide.
Shape the beach as a true gentle slope over at least 2 ft, not a sudden step down.
Check the level constantly
Check across the hole with a straight board and a level as you go, working from your reference stake. Fix any high or low spots now, while it is still just dirt.
Check the rim all the way around, not just across the middle.
Clean the hole out completely
Pick out every rock, root, sharp stone and piece of debris from the floor, shelves and sides. This is the step people hurry, and it is why so many ponds start a slow leak months later.
Tamp down any soft or loose patches. Run your hand over the whole surface: if it feels sharp, it will eventually find the liner.
Add sand to the floor if the ground is rocky
A 1-2 in layer of soft sand over the floor and shelves adds protection. It will not stay on steep sides, which is what the underlayment is for.
Putting the liner in
Underlayment and liner
Two layers, laid on a calm day. Wind and a big sheet of rubber liner do not mix.
Lay the underlayment first, over everything
A thick non-woven geotextile pond underlayment over the floor, shelves, sides and out past the edges. Overlap the pieces generously.
Double it on rocky or root-filled ground. It costs little, and it is what stands between the liner and a slow leak.
Unfold the liner on a warm, calm day
A 45 mil fish-safe EPDM liner (the usual choice in the US) is far more flexible when warm and much easier to fold neatly. Drape it loosely over the hole with an even overlap all around and let it relax in the sun.
Go barefoot or wear soft-soled shoes, and keep sharp tools away from it.
Let the water do the work
Start filling slowly with a hose in the deep zone and let the weight of the water pull the liner into shape. Ease and adjust the folds as it fills instead of trying to tailor it dry.
Gather the extra into a few large, deliberate pleats, especially on curves, rather than lots of small wrinkles. Big pleats vanish under plants; small creases collect debris.
Weigh down the edges as it fills
Hold the overlap down with stones or bricks as the water rises, moving them as the liner settles.
Do not cut anything yet.
Fill it to the top, then wait a day
Fill it right up so the liner takes its final shape, and leave it overnight before touching the edges.
Check the rim level again: the water line now shows you exactly where the digging was off.
Trim only once everything has settled
Leave at least 12 in of liner beyond the water line all around, then trim. Any less and you have nothing to work with when you build the edge.
Keep the offcuts. They line a bog garden, patch a tear, or protect the liner under rock.
Fill a new pond with rainwater if you can, from rain barrels or by letting a rainy spell do it. Tap water carries nutrients that feed an early algae bloom, and city water is treated with chlorine or chloramine that harms fish and other pond life. If you use tap water, add a pond dechlorinator that also neutralizes chloramine, wait a couple of weeks before planting, and expect the pond to turn green and then clear as it settles.
As an Amazon Associate, PlantMapper may earn from qualifying purchases. Prices and availability are set by Amazon. Open water is a serious hazard for young children and animals. Where a pond is not the right choice, a basin fountain gives you the sound of water with no standing water at all.
The part everyone sees
Edges and blending the pond in
The edge is where a pond looks right or wrong, and the rule is simple: no liner showing, anywhere. Each option below is just a way of getting there.
Beach and river rock edges
The best edge for a wildlife pond, and the one that makes it look like it was always there.
Run the liner up the gentle slope and cover it with washed river rock and pea gravel, grading from larger stones at the top to smaller ones at the water line and into the water.
Put a second layer of underlayment between liner and rock so stones cannot wear a hole through it.
Vary the stone sizes and cluster them. A ring of same-sized rocks around the rim, the "string of pearls" look, is the classic sign of an amateur pond.
Carry the beach a little way out of the water into a damp margin, so there is no hard line between pond and yard.
This is the edge that lets frogs, turtles, birds and dogs climb in and out, so give every pond one.
Sod and planted edges
The simplest and cheapest way to hide a liner, and very effective on an informal pond.
Bring the liner up above the water line and out flat, then lay sod or soil and plants over it right down to the water.
Keep the top of the liner above the surrounding ground so runoff, soil and lawn fertilizer or weed killer cannot wash into the pond.
Sod laid over the liner edge and cut to meet the water disappears completely within a season.
Use moisture-loving plants outside the edge as well as in the water, so the two zones blend.
Do not mow right to the edge: leave a strip of taller growth, which helps wildlife and hides the transition.
Paved and coped edges
The formal option, and the one that needs precision.
Set stone or concrete coping in mortar over the liner edge, overhanging the water by 1-2 in so it casts a shadow line and hides the liner completely.
The overhang is what makes a formal pond look finished; a flush edge shows the liner and the water line every time the level drops.
Levels must be exact all the way around; a formal pool acts like one giant level.
Use textured, slip-resistant stone. Wet coping beside water is exactly where people fall.
Keep mortar out of the water while it cures: fresh cement sends the pH sharply up and harms fish and wildlife.
Wait a few weeks after any mortar work before adding plants or fish.
Raised pools and timber edges
A raised pool is easier on your back, easier to look into, and much safer around small children than an in-ground one.
Build the wall in concrete block, brick or landscape timbers and line the inside: the structure holds the shape, the liner keeps the water in.
A wide cap at about 16-18 in high doubles as a bench, one of the nicest touches for a small pool.
Use lumber rated for ground contact for anything touching soil, treat every cut end, and never use old creosote railroad ties anywhere near pond water.
Line the timber so wet soil and water are not sitting against it, and tuck the liner behind the cap.
A raised pool is still open water. Around small children the height helps, but a cover or barrier may still be needed.
Vary and cluster the stone; a ring of same-sized rocks is the classic giveawayEvery seam in a waterfall is a possible leak: run the liner in one piecePlanting brought right to the water is what hides the edge completely
Bringing it to life
Filling, settling in and the first season
A new pond takes a season to find its balance. Knowing what is normal saves a lot of needless fixing.
Use rainwater where you can
Rainwater is low in nutrients and far better for a new pond. Tap water often carries nitrates and phosphates that feed algae, plus chlorine or chloramine.
If you use tap water, treat it with a dechlorinator, wait a couple of weeks before planting, and longer still before adding fish.
Expect green water, then clear
A new pond nearly always turns green within the first few weeks. That is normal: there are plenty of nutrients and nothing competing for them yet.
It clears by itself as the plants establish and use up those nutrients, usually within six to twelve weeks. Do not drain it and start over, and skip the chemicals.
Plant it as soon as it settles
Plants are what balance a pond, so get the submerged plants and marginals in early rather than waiting for the water to clear.
Aim to cover around half the surface with lily pads or floating leaves, and plant the margins generously with natives. Never use invasive floaters such as water hyacinth or water lettuce. See planting and care.
Let wildlife find it
Do not bring in eggs, tadpoles or plants from another pond or the wild: that is the main way diseases and invasive species spread. Wildlife shows up remarkably fast on its own: water striders within days, dragonflies and damselflies the first summer, and frogs and toads usually within a year or two.
A half-sunk branch or a flat stone at the beach edge gives everything a way in and out.
Add fish last, if at all
Fish change a pond's ecology completely and bring filtration, feeding and much more work. In a wildlife pond they are the one thing to leave out. They also attract raccoons and herons.
If you want fish, wait at least a couple of months after planting, stock lightly, size the filter for the fish rather than the gallons alone, and make sure the deep zone is right for your winters.
Top it up as it settles
A new pond loses a surprising amount to evaporation, especially in hot, dry summers, and to soil soaking up water at the edges. Top up a little at a time, with treated water if it comes from the tap.
Watch the level for the first few weeks: a steady drop that carries on in rainy weather is a leak, not evaporation.
Other kinds of feature
Preformed ponds, fountains and waterfalls
Short notes on building the other three. Same principles, different details.
Preformed ponds
Harder than they look
The shell is easy to buy and surprisingly fussy to install well. Nearly every problem comes from poor backfilling, which warps the shape and leaves gaps.
Turn the shell upside down, mark around it, then dig a hole matching its shape with 2-4 in to spare all around.
Set it on 2 in of tamped sand and check it is level in both directions before backfilling.
Backfill with sand or sifted soil in 4-6 in layers, tamping each and adding water to the pond at the same pace so the pressure stays even.
Never backfill all at once and never with rubble: gaps let the shell flex and crack, and frost heave in cold zones makes it worse.
Bring soil, sod or rock right over the lip to hide the plastic rim, which otherwise stands out.
Basin fountains
The easiest build
A buried basin, a grate, a pump and an ornament. The whole job usually takes a morning, and the details that matter are access and splash.
Dig a hole for the basin, set it level on tamped sand and backfill in layers.
Fit the grate so it is fully supported at the edges and strong enough to stand on.
Place the pump so you can lift the stones and grate and reach it without taking the feature apart.
Set the ornament so the splash falls back onto the stones, not onto the patio or into a bed.
Run the cord along a protected route to a GFCI-protected outdoor outlet with an in-use cover; see electrical safety.
Streams and waterfalls
Where leaks happen
A stream is a chain of small pools and drops, each holding a little water, fed by a pump in the bottom pond. The building risk is the seams.
Use one continuous liner for the whole run wherever possible: every seam is a possible leak.
Where a seam cannot be avoided, overlap it generously with the upper sheet on top, so water cannot run underneath.
Turn the liner up well above the water along both banks; splash and wind push water farther than you would expect.
Build each drop with a flat stone set in mortar or foam sealant over the liner, with the liner carried over the lip underneath it.
Test with the pump running before finishing the edges. You will find at least one spot where water escapes.
Bog gardens
The easiest addition
A bog garden next to the pond doubles the habitat, gives the overflow somewhere to go and is the simplest thing on this page to build.
Dig 12-16 in deep, line it with liner offcuts, and poke a few holes in the bottom so it stays damp rather than stagnant.
Backfill with a mix of soil and compost, and keep it moist.
Connect it to the pond's overflow point so extra water feeds it.
Plant natives such as cardinal flower, swamp milkweed, Joe Pye weed, marsh marigold and blue flag iris, with hostas or Siberian iris for shade and color.
No open water at all, which makes it a genuinely good choice where small children play.
Avoid these
Six building mistakes
These are the ones that end in a visible liner, a slow leak, or a pond nothing lives in.
1. A rim that is not level
A pond is a level the size of the pond. If one side of the rim is 1½ in low, liner shows along the high side forever, and it is almost impossible to fix once the pond is built.
The fixCheck the level from a fixed reference stake with a straight board and level all around the rim before lining, and correct it while it is still just dirt.
2. Not cleaning out the hole
One sharp stone or cut root left on the floor or a shelf will work through underlayment and liner over the months, and a slow leak in a lined pond is very hard to find.
The fixRemove every rock, root and sharp edge from the floor, shelves and sides, run your hand over the whole surface, then lay proper underlayment over everything, doubled on rocky ground.
3. Straight sides and no shelves
A flat-bottomed bowl with steep sides leaves nowhere to plant, nothing for wildlife to climb out on, and a pond that overheats in summer and freezes solid in a cold winter.
The fixDig a plant shelf at 8-10 in, a deep zone sized for your winters, and at least one gently sloping beach. It costs nothing extra while you are digging.
4. Liner showing at the edge
A band of black liner above the water is the single thing that makes a backyard pond look amateur, and it shows more each time the level drops in summer.
The fixLeave 12 in of liner beyond the water line, then hide it completely: rock over underlayment, sod or soil brought to the water, or coping overhanging by 1-2 in.
5. Trimming the liner too soon
Trimming before the pond is full and settled leaves you short of liner exactly where you need it for the edge, and there is no going back.
The fixFill the pond completely, let it settle overnight, then trim, keeping at least 12 in beyond the water line all around. Save the offcuts for a bog garden and repairs.
6. Mortar and cement in the water
Fresh cement and mortar push the pH sharply up and harm fish and pond life, and it is easy to do by accident when setting coping or building a waterfall.
The fixKeep mortar out of the water while it cures, rinse off splashes right away, and wait a few weeks after mortar work before planting or adding anything alive.
Print it or tick as you go
The pond-building checklist
Fifteen steps from a marked-out shape to a filled pond. Your ticks are saved in this browser only.
Before digging
Digging
Lining and edges
Questions
Building a pond: your questions answered
Eight answers to the questions that come up most.
How deep should I dig a backyard pond?
Dig a profile, not one depth. A plant shelf 8-10 in deep and 10-12 in wide holds most of the plants; a deeper zone over a good part of the area keeps the temperature steadier; and at least one gently sloping beach from zero to about 4 in lets wildlife in and out. How deep the center goes depends on your winters: if fish will overwinter, around 24-30 in is common in moderate cold and 3 ft or more is wise in zones 3-4, while ponds in zones 7 and warmer can be shallower. Slope the sides about 20 degrees off vertical so soil and stone stay put.
Do I need underlayment under a pond liner?
Yes, and it is the step people most often skimp on. The most common cause of a leaking pond is a puncture from below, from a rock or root left in the hole, and it usually shows up months later as a slowly falling level that is very hard to trace. Clean the hole out completely, then lay non-woven pond underlayment over the floor, shelves, sides and out past the edges, doubled on rocky or root-filled ground. Put a second piece under any rock that will sit on the liner.
How do I hide the pond liner at the edge?
Leave at least 12 in of liner beyond the water line, then cover all of it. For a wildlife pond, bring washed river rock and gravel over the liner down a gentle beach, larger stones at the top and smaller at the water, with a second layer of underlayment beneath. For an informal pond, lay sod or soil and plants over the liner right to the water. For a formal pool, set stone coping that overhangs the water by 1-2 in, which casts a shadow line and hides everything.
Should I fill a new pond with tap water or rainwater?
Rainwater if you can. Tap water often carries nitrates and phosphates that feed an early algae bloom, and most city water contains chlorine or chloramine, which harms fish and other pond life. If you must use tap water, add a pond dechlorinator that handles chloramine, then wait a couple of weeks before planting and longer before adding anything alive. Either way, expect a new pond to turn green for six to twelve weeks and then clear on its own as the plants establish.
My new pond has turned green. What should I do?
Almost certainly nothing. A new pond turning green in its first few weeks is completely normal: the water is rich in nutrients and nothing is competing for them yet. It clears by itself, usually within six to twelve weeks, as the plants establish and take those nutrients up. Do not drain it and start over, and do not reach for chemicals. What helps is planting generously and early, especially submerged plants and floating leaves for shade.
How do I install a preformed pond properly?
The shell is the easy part; backfilling is where people go wrong. Turn it upside down, mark around it, and dig a hole matching its shape with 2-4 in to spare all around. Set it on 2 in of tamped sand and check it is level in both directions before backfilling. Then backfill with sand or sifted soil in 4-6 in layers, tamping each layer and filling the pond with water at the same pace so the pressure stays even. Never backfill all at once and never with rubble, because gaps let the shell flex and crack.
How much soil will digging a pond produce?
More than most people expect. A pond about 6 x 7 ft and 2 ft deep on average produces close to 3 cubic yards of soil, and dug soil takes up more room than it did in the ground. Decide before you start whether it becomes a raised bed, a berm, a mound for a waterfall, a bog garden or a dumpster load. Moving it by wheelbarrow is a big part of the job, so plan the access route too.
Do I need to call 811 before digging a pond?
Yes. Call 811 or file your state's online request a few business days before you dig, and utilities will mark their buried lines for free. A pond hole often goes 2-3 ft deep, easily enough to hit a gas line, water service or electric cable. Private lines such as irrigation, landscape lighting or a cable to a shed are not marked, so dig the first spade's depth carefully by hand, and keep well away from septic tanks and drain fields. Set the overflow to spill onto your own lot, never toward the house or onto a neighbor's yard.